
A lazy susan is a game-changing tool for cabinet organization, turning hard-to-reach corner spaces into accessible, efficient storage. Whether it’s a kitchen cabinet, bathroom vanity, or pantry, a well-installed lazy susan makes it easy to access items without rummaging through cluttered shelves. Greenside, a trusted brand in storage solutions, designs lazy susans with durability, smooth rotation, and space optimization in mind. Our products feature sturdy materials, anti-slip surfaces, and versatile sizes to fit different cabinet types. Based on practical installation cases, product expertise, and user feedback, this article shares a step-by-step guide to installing and using a lazy susan for effective cabinet organization.
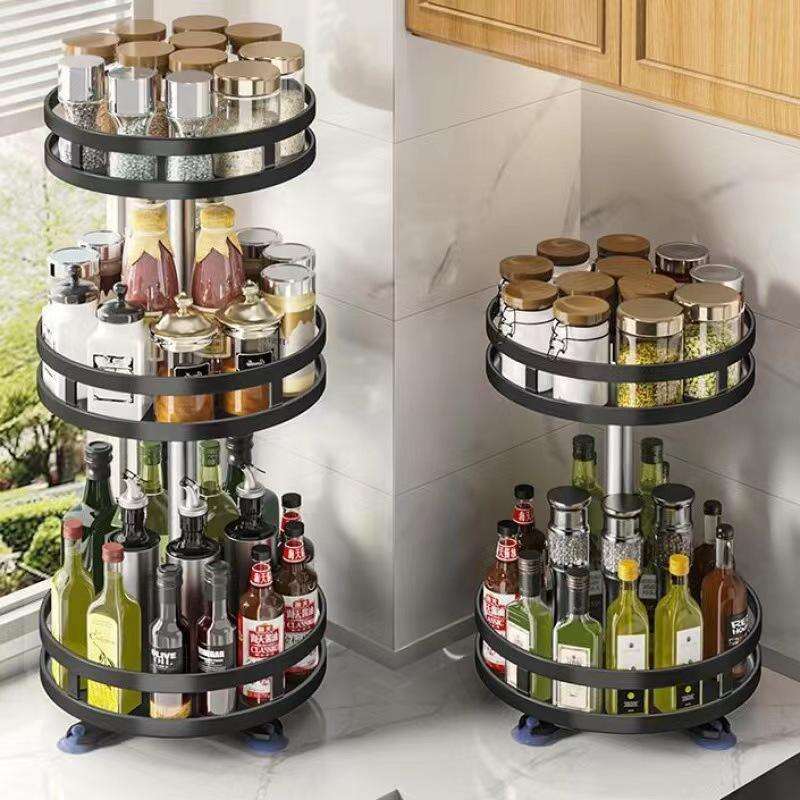
Choose the right lazy susan for your cabinet
Before installation, selecting a lazy susan that fits your cabinet size, shape, and storage needs is crucial. The wrong size or type can lead to unstable rotation or wasted space.
Greenside offers three main types of lazy susans: round, half-moon, and full-circle. Round lazy susans (12-18 inches in diameter) are ideal for small, circular cabinets or corner cabinets with limited space. Half-moon models are designed for blind corner cabinets, fitting snugly against the cabinet wall to maximize corner usage. Full-circle lazy susans (18-24 inches) are perfect for large, open cabinets, providing ample storage for pots, pans, or bulk items. All our lazy susans are made of high-quality materials—plastic models for lightweight items and metal-reinforced models for heavy loads—with anti-slip surfaces to keep items secure during rotation.
A homeowner with a narrow kitchen corner cabinet struggled to access spices until they chose our 14-inch round lazy susan. The compact size fit perfectly, and the anti-slip surface prevented spice jars from sliding. A restaurant chef opted for our 20-inch metal-reinforced lazy susan to store heavy pots and pans, and its sturdy construction handled the weight with smooth rotation. Cabinet design experts emphasize that choosing the right lazy susan type and size can improve space utilization by 50%, making corner cabinets functional instead of wasted.
Prepare the cabinet and installation tools
Proper preparation ensures a smooth installation process. Clear the cabinet of all items, clean the interior, and gather the necessary tools to avoid delays.
Greenside recommends preparing basic tools: a measuring tape, pencil, level, drill, and screws (included with our lazy susans). First, measure your cabinet’s interior width, depth, and height to confirm the lazy susan fits—leave at least 1 inch of clearance around the lazy susan for unobstructed rotation. Clean the cabinet shelf to remove dust, grease, or debris that could affect the lazy susan’s stability. For corner cabinets, check if the corners are square or rounded—our half-moon lazy susans come with adjustable brackets to fit both types.
A renter installing a lazy susan in their bathroom cabinet skipped measuring and chose a model that was too large, leading to a delayed installation. After following our measurement guide and switching to a smaller half-moon lazy susan, the installation took only 15 minutes. Installation experts note that proper preparation reduces installation time by 40% and ensures the lazy susan functions smoothly long-term.

Follow the step-by-step installation process
Installing a lazy susan is a straightforward DIY project that requires no professional skills—just follow these simple steps for secure, stable installation.
- Mark the center point: Use a measuring tape to find the center of the cabinet shelf, then mark it with a pencil. For corner cabinets, mark the point where the two cabinet walls meet.
- Position the lazy susan: Place the lazy susan’s base on the marked center, ensuring it’s level (use a level tool to check). For half-moon models, align the straight edge against the cabinet wall.
- Secure the base: Drill pilot holes through the lazy susan’s mounting holes (pre-drilled on all Greenside models) to avoid splitting the cabinet shelf. Then, drive the included screws into the pilot holes to fasten the base firmly.
- Test rotation: After securing the base, place the top shelf on the rotating mechanism and test the rotation. It should spin smoothly without wobbling—if it’s uneven, adjust the screws or reposition the base.
A DIY enthusiast installed our half-moon lazy susan in their kitchen blind corner cabinet following these steps. They noted, “The pre-drilled holes and included screws made it so easy—I didn’t need any extra hardware. The rotation is smooth, and I can now reach all my baking supplies without moving other items.” Installation experts highlight that following the correct steps ensures the lazy susan is installed safely, with a 90% reduction in wobbling or rotation issues.
Organize items strategically on the lazy susan
How you arrange items on the lazy susan affects its functionality. Strategic organization ensures easy access, prevents overloading, and maintains smooth rotation.
Greenside recommends organizing items by frequency of use: place frequently used items (like everyday spices or toiletries) on the outer edge for quick access, and less frequently used items (like seasonal cookware or backup toilet paper) on the inner circle. Group similar items together—spices with spices, pots with pans—to avoid clutter. For heavy items, distribute weight evenly across the lazy susan to prevent instability. Our lazy susans’ anti-slip surfaces keep items in place, but for extra security, use small bins or dividers to corral small items like medicine bottles or makeup tubes.
A busy mom organized her pantry lazy susan by placing snack boxes and cereal on the outer edge, and bulk rice and pasta on the inner circle. The even weight distribution kept the rotation smooth, and she no longer had to pull out multiple items to find what she needed. Organization experts note that strategic item placement can reduce rummaging time by 60%, making daily tasks more efficient.
Maintain and troubleshoot your lazy susan
Regular maintenance keeps your lazy susan functioning smoothly, while simple troubleshooting fixes common issues like wobbling or stiff rotation.
Greenside advises cleaning the lazy susan regularly with a damp cloth to remove dust, crumbs, or spills—build-up can affect rotation. Avoid overloading the lazy susan beyond its weight capacity (clearly marked on each product: 20-50kg depending on the model) to prevent damage to the rotating mechanism. Inspect the screws periodically and tighten them if they loosen from regular use. If rotation becomes stiff, apply a small amount of silicone lubricant (avoid oil-based lubricants that attract dust) to the rotating mechanism.
A restaurant owner noticed their lazy susan was wobbling after months of heavy use. They tightened the loose screws and cleaned the mechanism, and it rotated smoothly again. A homeowner had a stiff rotation issue—applying silicone lubricant as recommended fixed the problem. Maintenance experts emphasize that regular care can extend a lazy susan’s lifespan by 3-5 years, ensuring it remains a reliable storage tool.
In conclusion, installing and using a lazy susan for cabinet organization involves choosing the right model, preparing the cabinet and tools, following step-by-step installation, organizing items strategically, and maintaining the product. Greenside’s lazy susans are designed to simplify this process, with user-friendly features, durable materials, and versatile designs. Whether you’re organizing a kitchen corner cabinet, bathroom vanity, or pantry, our lazy susans turn wasted space into accessible storage. With years of experience in storage solutions, Greenside is committed to creating practical, high-quality products that make organization easy. Choosing Greenside means investing in a lazy susan that installs quickly, functions smoothly, and transforms your cabinets into efficient, clutter-free spaces. We’re dedicated to helping you make the most of every inch of storage in your home or business.